Mood:
Now Playing: Cooked Still, "Still Live"
Topic: musings
Simply Embracing Simplicity
Several years ago, I finally took needles and yarn in my fists and applied the lessons of my grandmothers. I learned to knit. Like many, I began with the simple scarf in stockinette stitch. I don’t know what it was, but after several false starts in previous years, this time I was hooked. Soon I was pouring over my McCall’s Needlework Treasury and teaching myself different stitches and trying new patterns. I moved on to hats, mittens, and finally socks. Last year I even successfully knit a baby sweater.
If I’m sitting still, I’m clicking away with needles. While watching movies, visiting with family and friends, in the car, and on occasion, even in the dark! I’ve taken to keeping my headlamp, normally used only for camping and backpacking, in my knitting back. Just in case. I know I’m not the only one.
I love to peruse knitting sites like ravelry.com hunting for new, more challenging patterns. Like many of you, I am not content to knit the same pattern over and over. I want more difficult projects, pushing myself to try new things, to become a better knitter.
But recently I’ve been pushing harder and the needles have been clenched in frustrated fists, yarn knotting in thick snarls. I’ve frogged (rip-it! rip-it!) more sorry socks this past few weeks than ever before. And they were not a tough pattern, either. Annoyed and uninspired to pick up projects that were only bound to cruise toward disaster, I actually watched a couple movies, and the only stitches were in my ribs! When I did pick up my needles and yarn, I only knit a few rows before putting it aside. This was not right.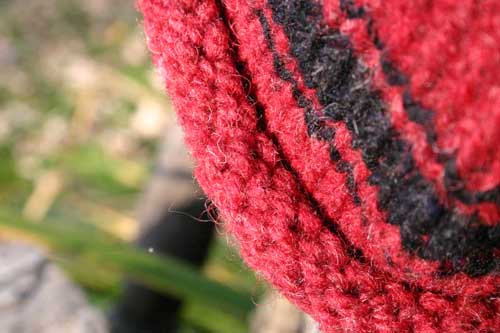
Then one day a friend hinted that I’d promised him a hat. I’d been putting off this simple project for too long. Knowing I’d be seeing him soon, so I grabbed some favorite worsted-weight wool from Scarecrow Farms in mountain berry red. Perfect for the avid backpacker who would wear it.
As I cast on the familiar number of stitches, I noticed a difference right away. The tension I normally hold in my shoulders eased immediately, I got into a relaxing rhythm of knitting. It was good. I finished the hat just in time to give it to my grateful friend, who put it on right away, smiling. It looked great on him, and I loved how the pattern of simple stitches let the nuances and more subtle hues of the red wool shine through. It was good.
I will never cast aside the simple knitting pattern again. There is just as much to admire in a lovely roll-rim hat as in a cabled sock. And that is perhaps one of the greatest beauties of knitting.
-Heather


Mood:
Topic: musings
SOS! SSS!
(Or, Second Sock Syndrome: A Cautionary Tale)
Many of us have been there. We start off with so much enthusiasm, revelling in luxurious yarn or challenged by a swoony new pattern, and stitch along merrily. Maybe we finish it quickly, triumphantly binding off in record time. Hurrah! Soon our needles or hooks cool and our giddy euphoria begins to ebb. And our condition becomes quite clear. Quite. This is only the first of a pair of mittens, gloves, or slippers. In my case, it’s a sock. I have (to be mumbled with all due gravity)
((( Second. Sock. Syndrome. )))
I’ve only felt the symptoms of this vile virus a couple times, normally grounding myself with regular reminders. This is the first of two. Binding off the first toe is only the halfway point. And even on my spindliest size-two needles, the socks go quickly. Both of ‘em.
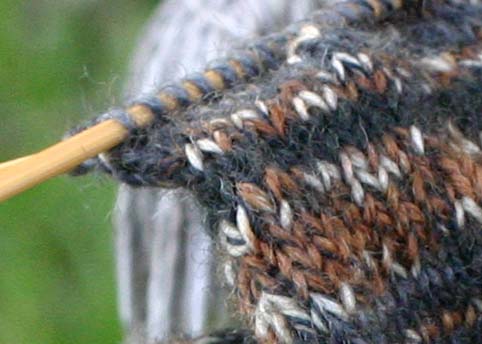
But oh my, this time I’m mired in it. I started these socks for my father-in-law back in August and knitted my way through sock one with gusto. It was a simple pattern, and I used some nifty self-striping yarn in browns, I enjoyed watching the pattern come together as I knitted. Bit all the while I heard a little voice, a shrill whistle in my ear. This yarn has no give! No stretch! They will be tooooo smalllll! But I knitted on, tuning out the warnings, because after all, I’d already turned the heel. There was no going back, right? (Oh, and I might be a bit stubborn.)
So, um, that cautionary screech? She was so right. When my father-in-law tried on his stripedy sock, he could hardly fit his foot into the heel. Arrrg! Foiled! At least I didn’t cry. Instead, I cast on for a new sock, adding 10 stitches. Happily, I bought an extra skein, so I have plenty of yarn and one less thing to worry about.
So this time, all through sock two, which is really sock one, a murmuring worry rumbles as I knit and purl, increase and decrease. I just finished the gusset and am hopeful that this one will be the right size. Maybe by the end of the weekend, I’ll be starting sock three, which is really only (long sigh) sock two.
For encouragement, I promised myself that I can start knitting with my POEMS SOCK yarn when I finish these beleaguered, belated birthday socks. Ah, it occurs to me that I should also start my Christmas knitting, but I’m not sure anyone is getting socks this year.
-Heather
Topic: knit a longs
10/6 edit: corrected snafu in sleeve length/rounds worked.
With just the sleeves left to finish, we come to one of the BEST parts of seamless knitting: professional looking results as you just knit along. I cannot tell you how many sad sleeve seams have walked into Countrywool, looking for new life. This is actually one of the BIG topics at next spring's Rip Van Winkle FORENSIC KNITTING Retreat. Finishing is an art form, and the more you understand grafting/kitchener stitch/weaving, the better you get at it.
But, I digress. Let's get to the main event.
The sleeve stitches are waiting for your circular needle to get slipped into them, and for more of them to be picked up at the underarm and connected in the round to be worked down to the cuff. If the sleeve length you want is greatly different than the length in the pattern, you will need to adjust where the decreases are located, so give me a shout.
When the buttons are sewn on, button them into their matching eyelets. You will notice that you have to urge them to get connected at first. That's OK and to be expected before you block this sweater. When you wet block it, the buttonholes you have chosen will stretch bigger from the water. You may choose to overcast their edges after the first couple of wearings if you have a hard time finding them, although I have not found that to be an issue.
SLEEVES
Overview: Sleeves are knit across existing stitches on needle holders, and then one stitch for each Cable Cast On stitch is picked up across underarm. In the first round, two stitches are decreased. The sleeves are knit in the round down to the cuff area; decreasing 2 stitches at the center spot of the underarm every few rounds as noted. Row gauge is important when determining sleeve length, so after the first 4" is worked, a gauge check will keep things on track. If your row gauge is TIGHTER, (more rounds to the inch than the pattern), you will have decreased all the stitches you need to SOONER, so all stitches will be worked evenly around after the number you need is reached. If your row gauge is LOOSER, (less rounds to the inch than the pattern), you will not be able to decrease all the stitches you need to, so will need to DOUBLE UP ON SOME INCREASES to get rid of the stitches you need to before you reach the cuff area. Both of these fixes will look absolutely fine IF you make each sleeve exactly the same way.
SIZES: 36 40 44 48 52 56 60 64
Sleeve: With right side facing and 16" larger sized needle, INVISIBLY JOIN yarn at the right side of underarm stitches that were cast on at the Body Joining Round. Pick up and knit one stitch for each cable cast on stitch
of underarm: ___ stitches to add.
14 16 18 20 20 22 24 24
Work across sleeve stitches on holder in established stockinette stitch, until one stitch BEFORE last one, then K2TOG (last stitch of sleeve stitches and first stitch of underarm stitches), knit across underarm stitches to BEFORE last one, then K2TOG (last stitch of underarm and first stitch of sleeve stitches). Find midpoint of underarm stitches and place a clip marker between two stitches here to denote BOR.
___ stitches total now on needle.
62 70 76 82 88 94 100 106
You will work___ rounds in total (not including 1"/8 rounds for cuff),
105 112 119 126 133 140 147 154
to achieve a sleeve length of___".16 17 18 19 20 21 22 23
Mark the center of the underarm stitches as BOR. Work 4" evenly in knit (this is a good place to lengthen/shorted sleeves), then decrease every 5th round on either side of this marker by:
*SSK, Knit marked stitch, K2TOG*.
When you have reached ___ stitches, decreasing will cease.
42 46 50 54 58 62 66 70
Work evenly around the stitches in pattern as established until almost ___" from the underarm.
15 16 17 18 19 20 21 22
CUFF
With smaller 12" circular needle or double pointed needles, decrease 6 stitches evenly in the next knit round, then:
Work in *K1, P1* rib for 4 rounds, then PURL 4 rounds more.
Work a SEWN OFF BIND OFF for maximum stretch.
Make 2nd sleeve as first sleeve. Darn in ends. Sew on buttons where desired.
(Women's buttons are traditionally on the left). Wash and lay flat to dry block.
Mood:
Now Playing: Iron & Wine, "Love and Some Verses"
Topic: musings
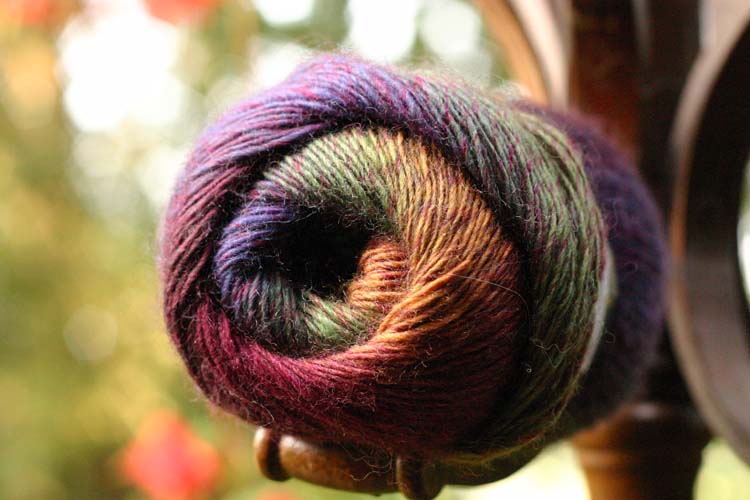
My sister (not a knitter, I must add) spotted this gorgeous skein when we were in Harrisville Designs a few weekends ago and knew immediately that it was meant for me. The jewel colors are my favorite, indeed, but with the name POEMS SOCK (colorway "Grape Arbor"), it nearly sprang from the basket & into my eager hands.
Naturally, this muse-worthy yarn is destined for socks. But for me. Yes, me! I have been knitting socks for a couple years now & have only one pair of my own. My sister has four pairs, my husband has three, & my mother two, maybe three. I am determined this will be my next project...after I finish some socks for my father-in-law.
I am still debating on a pattern. I'd like something interesting to knit so I don't get bored, but not so complex as to distract from the yarn. Suggestions, anyone?
Will I wear them to write poems? Read poems? Merely wax poetic? Stay tuned!
-Heather
9/16 EDIT: Corrected the sequence for stitch removal.
Barb e-mailed me with a question on how to make the yoke a bit longer. I've added the next page of the pattern below, which has information on using FAKE INCREASES to keep the raglan lace line going, but not add any stitches. So, here you are!
SIZES: 36 40 44 48 52 56 60 64
then insert FAKE INCREASE STITCHES as follows in place of and instead of established increases:
* knit to 2 stitches before marked stitch, K2TOG, YO, knit marked stitch, YO, SSK*
Continue using fake increases until entire yoke measures___" from cast on row measured at center back of sweater, ending after a purl/even row has been worked.
7 ½ 8 8 ½ 9 10 10 ½ 11 11 ½
REMOVE SLEEVE STITCHES FROM NEEDLE
Keeping edge stitches in pattern, work ___ LEFT FRONT stitches,
44 48 52 55 61 64 69 73
Placing a temporary marker for counting, work across ___ LEFT SLEEVE stitches and then
50 56 60 64 70 74 78 84
slide them onto a short circular needle and place point protectors at each end.
Work ___ BACK stitches in pattern
76 88 92 98 114 116 130 134
Placing a temporary marker for counting, work across ___ RIGHT SLEEVE stitches and then
50 56 60 64 70 74 78 84
slide them onto a short circular needle and place point protectors at each end
Work remaining ___ RIGHT FRONT stitches, finishing the row keeping the edge stitches in pattern.
44 48 52 55 61 64 69 73
BODY JOINING ROUND
Work across stitches in pattern, and as you come to each underarm, cable cast on ___ stitches,
14 16 18 20 20 22 24 24
connecting front to the back at the first underarm, and back to the front at the second underarm.
There are now ___ stitches on the needle.
192 216 232 248 276 288 316 328
Work in established pattern to hem, ___" measured from joining round at underarm, OR ½" less than desired length, ending after a purl/even row has been completed.
16 16 ½ 17 17 ½ 18 18 ½ 19 19 ½
BOTTOM EDGE
Overview: Ribbing stitch is established between Edge Patterns, and stitches are decreased evenly across, ending with a K1 before last Edge Pattern is worked.
Row 1: Decrease Row: With smaller long needle, work 12 edge stitches in pattern, then
*K1, P1, K1, P1, K1, P2TOG*, repeating across row ending ___ stitches before last 12 edge stitches,
7 3 5 7 7 5 5 3
*K1, P1* repeating to last one and THEN K1, work across last 12 stitches in edge pattern.
Work 3 more rows in ribbing stitch/edge pattern as established.
Last 4 Rows: purl one row, knit one row, purl one row, knit one row.
Work a SEWN OFF BIND OFF for maximum stretch.
Topic: knit a longs
Thanks to Sheila, we think Deb from PA will FINALLY be saved from insanity.
The cast on number needs to be an odd one to get the neckband to work out correctly.
So, subtract one from all the cast on #s and you are good to go.
However, we need that stitch put back in on the last row of the neckband to make the yoke numbers work out properly, so add it back just before the Double Eyelet Cable pattern by knitting in the front and back of the same stitch. Yes, I know that the stitch to be worked should be a Purl 1, so just change it to the above and all will be well.
I get by with the help of my friends.
The corrected numbers are now on the original post. If you already made a copy, go back and mark the new changes on it.
An explanation (although there is never an excuse for inaccuracy): I originally used an odd number for the cast on. In the final edit, I was totally embroiled in getting the body stitches to separate from the yoke stitches evenly and I arbitrarily reassigned even numbers to the neckline completely forgetting about the need for oddness. I do remember wondering at how easy it seemed after all my agonies from previous sessions crunching the numbers. Goes to show ...the easy path is seldom the right one. (quoted by my Virgo husband)
Topic: musings

This week I cut off all my hair,
-four years and fifteen frenetic inches, waist to chin,
slip without even a whoosh to the floor-and I learned to knit.
All last week you cupped my carroty braid in your hand,
knit your brow,
and implored me to change my mind.
Instead, I wrap up my locks in a plain, brown package.
Hope this fistful of curls, coiled into a thick hank,
brings braids to a girl who can't grow her own.
I buy coppery skeins of thick, knotty wool,
and hold them against my cold cheek,
listen to the clicking of cool, gleaming needles.
At first, I wind tight loops,
insistent fists refuse to move
and catch on my white knuckles.
I tangle and knot,
grimace and curse,
and, finally, knit and purl.
Orange streaks of dye stain my fingers.
Loose, red ringlets swing around my bare ears.
And I knit you a long, red scarf.
Topic: knit a longs
Sheila e-mauled e-mailed me to let me know the KEY was nowhere in the last post. ARGH! See it below.
KEY
(you'll be surprised what you'll learn here, so read it well ...and often)
* * = repeat directions between * * until end of row/round
BLOCKING = Sweater measurements can change dramatically before and after blocking. Blocking is best done by hand and with lots of water. Run a basin of warm to hot water. Dissolve 1 capful of shampoo into it without making any suds. Submerge the finished garment for a 10 minute soak. Run another basin of hotter water. Squeeze out the sweater carefully, and submerge into the clear water. Let soak for 10 minutes. (Note: if the yarn was very scratchy the sweater can be softened with another soak, adding 1 capful of carefully dissolved hair conditioner before adding the sweater). Take the wet sweater to a washing machine and spin out the water on the GENTLE spin cycle (no rinse water added by the machine); OR squeeze the sweater out carefully and lay on three towels. Roll them up and stand on them to extract as much water as possible. Lay the sweater out flat to dry; using a yardstick to even up edges, measurements, etc. Flip the sweater once every 12 hours until it is dry (takes a few days for tightly knit garments).
BOR = beginning of row or round
CABLE CAST ON = insert left needle between first two stitches on right needle. Loop working yarn around tip of left needle and pull stitch through to the front and place it on the tip of right needle. Repeat * to * for each stitch needed.
CR3TOG = cross 3 together = insert right needle into third stitch on left needle and knit it while leaving it in place, with new loop emerging on right needle. Then insert right needle into BOTH of first two sts on left needle, and knit them together. Now, slide all 3 stitches off of left needle = 1 stitch decreased.
DEC = DECREASE = K2TOG = knit 2 sts together as one
DP = double pointed needles
INVISIBLY JOIN = thread eye of darning needle with yarn. Sew into the base of the last stitch worked, and continue to sew for 2" in three different directions, creating a "Z" shape on the inside of the fabric. Cut end flush with surface.
K = knit
K2TOG = DECREASE = knit 2 sts together as one
K f/b = 1 stitch increased = knit in the front loop and again in the back loop of the same stitch
P = purl
PUW = PICK UP WRAP = Find the wrap around the base of the stitch, put your right needle point into it first, and then into the stitch itself (TWO Loops now on right needle point). Knit (or purl if on inside row) both loops together as one stitch
PM = place marker
SEWN OFF BIND OFF = Cut yarn leaving 4x the length of the edge to be bound off. Thread through darning needle. Cast off as follows: Darning needle goes through first 2 stitches on left needle together as if to purl. Leave stitches on needle. Darning needle goes through first stitch AGAIN, but as if to knit and then that stitch is dropped off needle. *Repeat from * to * until all stitches have been cast off. Sew yarn to first stitch.
SHORT ROWS = rows of knitting that are not completed to the end, but rather to a specific marker. At that point a SHORT ROW WRAP is worked to anchor the yarn before turning the work for the next row.
SRW = SHORT ROW WRAP = slip next stitch, bring working yarn through needles to opposite side of work, slip stitch back to left hand needle, put working yarn back to where it started. Turn work, leaving unworked stitches untouched.
SHORTER or LONGER = the length of the needle as compared to the others in the pattern
SRW = SHORT ROW WRAP = slip next stitch, bring working yarn through needles to opposite side of work, slip stitch back to left hand needle, put working yarn back to where it started. Turn work, leaving unworked stitches untouched.
SS = Stockinette Stitch = knit on front side/outside rows, purl on back side/inside rows
SSK = Slip, Slip, Knit = slip 1st stitch as if to knit, slip the 2nd stitch as if to purl, put point of left needle into fronts of those two stitches and knit both together.
TOG = together
YO = wind yarn around the right needle, one complete wrap, counterclockwise
Topic: knit a longs
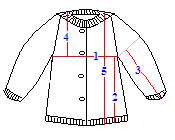
SIZES IN PATTERN (IN INCHES)
1. chest(finished) 36 41 44 47 53 55 61 63
2. side body length 15 ½ 16 16 ½ 17 17 ½ 18 18½ 19
3. sleeve length 16 17 18 19 20 21 22 23
4. shoulder depth 7.5 8 8 ½ 9 10 10 ½ 11 11 ½
5. total length 24 25 26 27 28 29 30 31
|
| When choosing sizes, measure an existing sweater's chest (buttoned if a cardigan) below the underarm, and double it to get the finished chest size. The thinness of this sweater knit in sport yarn requires 1"of ease for fit. If knit with worsted weight yarn, use 2" or more of ease. Make any number from your existing garment BIGGER when in doubt. The hem hangs straight after blocking. |

SIZES: 36 40 44 48 52 56 60 64
Overview: Starting at the top. Stitches are cast on and Double Eyelet Cable with I-Cord Edge Pattern is established as the first and last 12 stitches of each row. Stitches in between are worked in Knit 1, Purl 1 ribbing.
NECK BAND
with smaller long circular needle, cast on____ sts.
79 83 91 103 107 119 123 135
Note: on the first row ONLY, place a ring marker where the directions indicate to slip the marker (SM).
Work 1x1 ribbing and Double Eyelet Cable with I-Cord Edge Pattern as follows:
Row 1: K3, SM, P1, CR3TOG (see key), P1, K3, P1, SM, *K1, P1* repeating across row, to last 13,
K1, SM, P1, CR3TOG, P1, K3, P1, SM, yarn forward, slip last 3 stitches (as if to purl).
Row 2: K3, SM, K1, P3, K1, P1, YO, P1, K1, SM, *P1, K1* repeating across to 1 stitch before M,
P1, SM, K1, P3, K1, P1, YO, P1, K1, SM, yarn forward, slip last 3 stitches.
Row 3: K3, SM, P1, K3, P1, CR3TOG, P1, SM, *K1, P1* repeating across to 1 stitch before M,
K1, SM, P1, K3, P1, CR3TOG, P1, SM, yarn forward, slip last 3 stitches.
Row 4: K3, SM, K1, P1, YO, P1, K1, P3, K1, SM, *P1, K1* repeating across to 1 stitch before M,
P1, SM, K1, P1, YO, P1, K1, P3, K1, SM, yarn forward, slip last 3 stitches.
Now work Rows 1-3 again, and then with larger needle, work Row 4 again with the following addition: the red P1 becomes K f/b (one stitch increased): 8 rows total worked.
Note: When counting Double Eyelet Cable with I-Cord Edge Pattern stitches, count only after an even row has been worked.
ESTABLISH SHOULDER RAGLAN LINES & SHORT ROWS, AND BEGIN INCREASES
Overview: The first and last 12 stitches remain in the Double Eyelet Cable with I-Cord Edge Pattern already established. The remaining stitches will now be worked in Stockinette Stitch. Increases will take place on every outside/odd/knit row, while the inside/even/purl rows are worked evenly. AT THE SAME TIME, short rows will be worked over only part of each row to shape the back of the neck, until the arc measures close to 3" at the widest point. Short Rows are rows of knitting that are worked back and forth over only part of a row. They allow for shaping within garment construction. When turning to work back the other way, a hole will form in the knitting unless something is done. One way to prevent this is to wrap the working yarn around the base of the following stitch before turning to work back. This is called a short row wrap and directions are below and in the KEY. Because of the nature of short rows, the Double Eyelet Cable with I-Cord Edge Pattern will not be fully worked at the end of Row 1 until the neck arc is fully knit. At that point, Row 1 can be completed. The knitting will then proceed across all the neck stitches, and both edges will again be worked on each row.
Before beginning, markers will be placed INTO raglan increase line stitches AND others to mark short row neck shaping points.
PLACE MARKERS
Place clip markers (color A) INTO stitches as noted (these stitches become RAGLAN INCREASE LINES):
Stitch number
20 20 22 24 26 28 30 32
27 31 33 35 37 39 41 43
54 53 60 72 72 82 84 94
61 64 71 83 83 93 95 105
On every OUTSIDE Row, increasing takes place around these markers until the desired stitch number is achieved. On every INSIDE Row, stitches are purled across without increasing.
BEGIN WITH SHORT ROW SHAPING AND START RAGLAN LINE INCREASING
Row 1: Work first 12 stitches in Double Eyelet Cable with I-Cord Edge Pattern,
keeping any existing markers in place that keep pattern changes clear,
*Knit to before marked raglan stitch, YO, Knit marked stitch, YO* repeat from * to * 3x more. K 1, SRW next stitch and clip it (color B) to mark it and turn to work back.
YOU WILL NOT FINISH ROW 1 TO THE END at this time.
Row 2: Purl across to last clipped stitch. Purl it. SRW next stitch and clip it (color B) to mark
it. Turn to work back. (You will not work all the way across this or any of the following rows until later).
Row 3: *Knit to before marked raglan stitch, YO, knit marked stitch, YO*, repeat from * to * 3x more.
Knit to before color "B" clipped stitch. Remove clip, PUW while knitting this stitch, SRW next
stitch and move clip to this one. Turn.
Row 4: Purl across to before last color "B" clipped stitch. Remove clip, PUW while purling this stitch, SRW next stitch and move clip to this one. Turn.
Repeat (short) rows 3&4 until neck measures 3 ¼" to 3 ½" at widest point from cast on edge, ending after a Row 4 has been completed. Turn as directed.
Outside row: Knit to first SRW clip. Remove and discard clip, PUW while knitting this stitch. *Knit to
before marked raglan stitch, YO, knit marked stitch, YO*, repeat from * to * 3x more. Knit to
last SRW clip. Remove and discard clip, PUW while knitting this stitch. Knit across to last 12
stitches, to (finally!), finish Row 1 in Double Eyelet Cable with I-Cord Edge Pattern as
follows: SM, P1, cross 3 together, P1, K3, P1, SM, yarn forward, slip last 3 stitches (as if to purl).
Short Rows are finished.
Follow NECK BAND direction for Rows 1-4, with two additions:
Substitute stockinette stitch (knit all odd rows, purl all even rows) in between Double Eyelet Cable with I-Cord edge patterns. Continue to INCREASE on all odd rows until ___ stitches are on the needle,
264 292 316 336 372 392 420 448
Topic: knit a longs
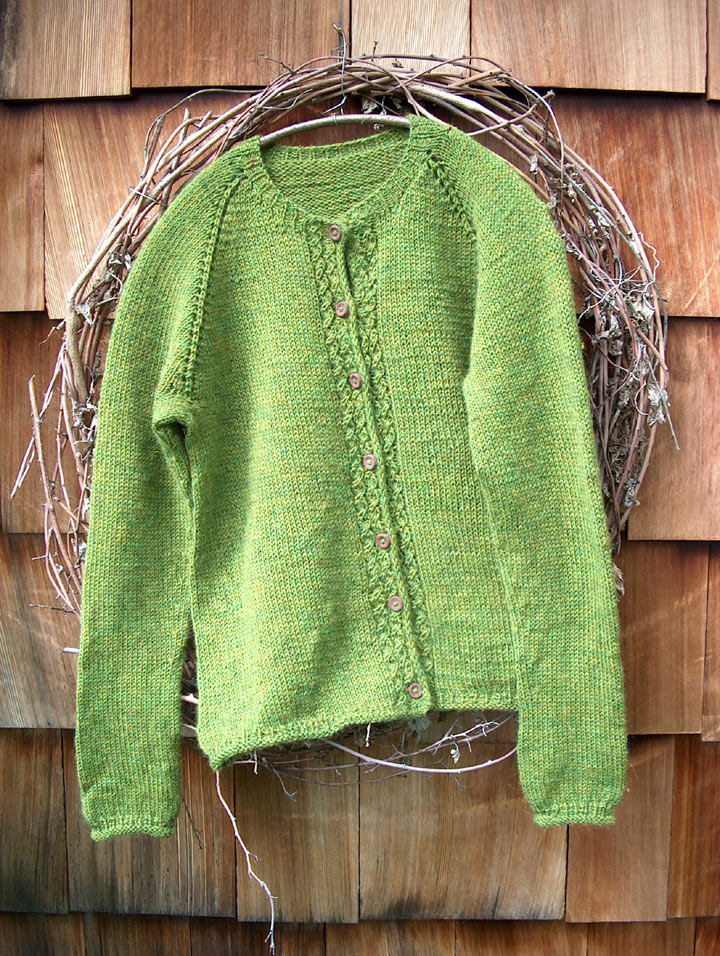
The sun peeked out for 1/2 hour yesterday and I got a picture snapped.
As I was adding the buttons, I happened to measure them. They are quite a bit smaller than I thought...about 5/8". So adjust the button size you look for.
Newer | Latest | Older